Null

Showing posts with label Under $100. Show all posts

Monday, 29 August 2016

Custom Creations from Loom Decor


I am more than aware of the fact that I have a serious pillow addiction. Lately I’ve been able to reign in the crazy and say ‘no’ to several beautiful pillows that have crossed my path, but when Laurel and Wolf asked if I was interested in learning more about Loom Décor and creating a free custom pillow, I jumped off my wagon and said YES.

Vaguely familiar with the brand (I can’t not click on an online ad with pretty pillows), I was given a tour of the site and services with one of their Pro Stylists, Erica. She walked me through the ins and outs of the shop, highlighting all of the services they offered, and the countless opportunities to create something customized—not to mention that each piece is handmade at their workshop in Nashville, Tennessee.
I’m pretty curious about their window treatment offerings and definitely want to give this service a whirl, especially since one of the site’s features includes a chat box with an online stylist ready to provide assistance (because you definitely don’t want to make a mistake when ordering custom window treatments…) But what I am most obsessed with are the bed skirts! For anyone who has recently shopped for these, you’ll know the struggle to find something that feels modern (read: NO ruffles) and in ANY colour other than white or cream. Sense my frustration? Honestly though, how cute is this?
Being the generous daughter that I am, I had my mom and dad’s room in mind when creating my custom pillow. We went with the Simple Lumbar style with feather insert, and pulled from their lengthy selection of blue fabrics. Immediately I was drawn to the breezy ombre palette and largescale print of Birds of a Feather in Pool (coincidently, that was my mom’s first choice too) and mom chose Mazing Grace in Aqua for the back of the pillow. When the pillow arrived, we were pleasantly surprised at how accurate the colours were – not always the case when ordering online. We had one small issue, where the zipper was placed on the wrong side of the pillow, but it took a few days for us to realize the mistake, and Loom was quick to replace for us.


Browsing their site, you definitely get caught up in all of the gorgeous fabrics and styles they have to offer, and I’ve rounded up a few fabulous prints that caught my eye…


Simple Throw Pillows: classic velvet - nectar / udaya - berry / classic linen - ivory w/ classic linen - terra cotta edge /  chantilly stripe - midnight / zoo-la-la - ruby / optrix - ash / xu garden - indigo / spot on - azure / babar - twilight / shore - classic / stream up - mist / band stand - oyster / classic linen - safari w/ classic linen - ivory edge /  classic linen - iron, casual linen - dune, crisp linen - dawn 


Wednesday, 27 April 2016

One Room Challenge: Week Four DIY'ing

Seems like it was only yesterday that I posted about Week 3....

Week Four was definitely productive, which is a good thing, considering there are only 2 more weeks to finish this little bedroom! Have you been following along with the One Room Challenge? Hosted by Linda of Calling it Home, she has challenged 20 Featured Designers along with 200+ Guest Participants to completely revamp a room in their home (or in some cases, a client's home). The hitch? We've only got six short and sweet weeks to finish the project.

If you'd like to catch up on the progress of my bedroom you can do so here:

Week One: The Mood Board 
Week Two: Don't ask....
Week Three: Accessories 

This week is all about the DIYs. First up is a project that is pretty near and dear to my heart. If you follow me on Instagram, you will have already gotten a glimpse of these beautiful night stands. They had belonged to my Bubi, who passed away just after Christmas. Her apartment was always packed with beautiful pieces of furniture, dishware, accessories, clothes, etc. And I always loved going through her cupboards and admiring her things. She was a storyteller and loved to give me the history of everything she had and now, more than ever, I am thankful she did.

She had always had these night stands in her bedroom, and I assumed that they were always yellow. However, after going through old family pics I had spotted them in a shot from the late 80's and realized they were originally cream, but had yellowed with age (and likely a glaze of nicotine).

Initially I wasn't sure where I wanted to keep these night stands, but now that I will be moving into a much smaller bedroom, these are the perfect size for my ORC room.

This past semester our class was introduced to local designer, Cathy Plum-Kleiser and her line of Peony and Plum Dust Paint. Similar to chalk paint, Cathy's line of furniture paint requires virtually no prep work. YEAH, that's right. No sanding or priming! Just a quick wash with TSP, let your piece dry, and then you're off! Once you've applied your first coat, you can apply a second coat in the same colour or a contrasting colour(s). I am painting my room in Benjamin Moore's colour of the year, Simply White, so I wanted to keep the tables in a similar shade. Cathy recommended going a shade darker then Simply White and colour matched a jar of paint in Benjamin Moore's Moonlight White for me. I applied two coats of the same colour, and sanded some of the edges so the original paint could be seen, then did a little extra sanding on some edges that went right to the wood.

When I first started painting I got a little worried that I was changing the tables and taking away some of their charm. It wasn't until I started roughing them up with the sandpaper that they began to have a little more character, and looked more like those beaten-up night stands I was used to. 

I even had a little "moment" after pulling out one of the drawers and finding a half-eaten roll of Mentos mints, something my Bubi always had in her purse. My mom and I took it as a sign that she was okay with what I had done to her beloved tables :)  

And voila! A little preview of what's to come. Will be finishing them both with beeswax, and using their original hardware. 


For more Peony & Plum inspiration, check out their collection of furniture at Castle & Park's online shop


Wednesday, 9 September 2015

back to school desk refresh

Desk Update photo Back-to-School-Desk---animation-update_zpsdclqez4n.gif

After such a busy summer it feels good to finally have some free time to putter around the basement and get my space ready for school. I spent a massive chunk of time commuting to downtown Toronto on the GO Train, but it forced me to slow down and think about what is important to me, why I am back in school and what I want my career to look like. With the help of two amazing podcasts (After the Jump and The Lively Show) I’ve settled on a list of goals that I would like to achieve. Some are short-term goals that I can chip away at over the next few months, and some are more long-term that involve a little more time and patience to achieve.
One short-term goal was to get my desk in shape and “blog-worthy” for the first day of school. Not only is it finished, but I managed to make a gif—something else I’ve wanted to take a stab at. It definitely isn’t perfect, but it is close enough and was surprisingly easy to create (this blog explains it all)

* * *

Last year I had a less then great experience with Rust-Oleum’s Chalkboard Paint and Magnetic Primer (purchased from Home Depot for $10 - $20 each). After four coats of Magnetic Primer, it still didn’t hold much more than a sheet of paper. The Chalkboard Paint was fine, but even after washing with water, there was always a cloudy film left on the wall. This year I decided to create a “Living Mood Board” by nailing an assortment of bulldog clips and magnets onto the wall. This way I can pin an assortment of fabric samples, paint chips, floor plans and more onto the space without requiring of a million magnets. A few favourite images and postcards are still hung using magnets, but the clips do a much better job at keeping things in place.

The rest of the space still needs some work, but am hoping to save those projects for the One Room Challenge, a bi-annual linking event hosted by Calling It Home (you can read all about it here)…another goal to hopefully cross off the list! For now, I feel ready for the new semester and putting this space to good use.


Monday, 25 May 2015

diy: trunk transformation

I have been struggling with this little trunk for almost a year. Initially painting it black and spray painting the trim and hardware gold, it never looked quite right. I had been using it as my coffee table, but felt too heavy for the space and the rest of my décor. When I moved back home, I had used it as a place to keep my parent’s stereo, and was shoved into a corner in the dining room and forgotten about. 

This weekend my sister, brother-in-law and two-month-old nephew will be moving in for the summer. My mom and I have been busy transforming the basement (which had been my office/homework space) into a bachelor pad for the little family. 

We installed a wall-to-wall built-in, rearranged the furniture and made several trips to the Goodwill (drop-offs only, no more shopping allowed). We were smart about everything we brought into the room, opting to keep pieces the pieces that were practical, functional and small-scale. 

When it came time to choose a coffee table, I wanted to bring back the trunk. It was compact and there was an opportunity to refinish the inside, and use it for storage (something I had always meant to do, but just lacked the time). That same week while perusing Instagram, I spotted a room Emily Henderson had styled for Target, and noticed that the coffee table she used was a white trunk. Fast-forward a few days later, and my old trunk is now sporting a crisp, clean shade of white. Light and airy, it matches the tone of the room, and blends in perfectly. 

The rest of the room is very close to being complete, but still in need of a few minor tweaks.

**For both versions of the trunk I used a matte wall paint from Para. Hardware and trim was spray painted, and have held up perfectly. 


Monday, 4 May 2015

floral shelf DIY


A few years ago I had picked up a set of three metal shelves from Urban Outfitters. Marked down so low that they were practically free, I grabbed them all without knowing where they’d wind up. Fast forward a year and a bit and my new room had an empty patch that was screaming for a set of three metal shelves ;)

I’m terrible at documenting projects with photographs, but covering the shelves was fairly simple. I traced each side of the shelf onto the wrapping paper, cut them out and pasted them piece by piece onto the shelf. For the top ledge, I used a slightly larger piece and folded the excess bit over to the underside of the shelf for a clean edge.

Gently smooth out the air bubbles as you lay the pieces of paper flat—this is probably the most important step to achieve a clean and smooth finish. Easy peasy.

The final product is now the perfect place to showcase an eclectic mix of books, pictures and mementos that had previously been cluttering the dresser.

Up next: deciding on a colour to paint that pink table!


Thursday, 18 September 2014

before & after: DIY white lamp


A few weeks ago I made, yet another, wonderful discovery in my building’s garbage hub: a brassy old table lamp. Stuck to its stained and dated lampshade was a note that read, Still works! :)  

I considered this a good find. Loved the look of the lamp, and was not 100% turned off by the brassy base (the lampshade was a definite no, and was left in the trash). After being left in its original state for a few weeks, I decided that a spritz of white spray paint would give it a more modern and chic look. 

Sporting a new $12 lampshade from Wal-Mart, my garbage lamp is complete! When I get tired of white, I can easily switch out the lampshade for something more dramatic, a la the lovely Rose Landscape Lampshade from Anthropologie (spending a few extra $$ on a shade is easier to justify when you scored the base for free) OR easily repaint the base in a new colour. Another option, would be to try sanding off some of the white, for a brassy-weathered-look (no idea if that would actually work…but worth a try one day) 

And, a friendly reminder to please vote for my bedroom in Apartment Therapy's Room for Color contest. Winner receives a $1000 gift card to Fab.com and some much-needed paint from Sherwin-Williams. Thank you! 


Thursday, 4 September 2014

my new neighbourhood: kijiji finds

Today my dad and I posted a few things on Kijiji, which led to me browsing some local goods. Found a few items worth a second look and thought I'd share, just in case your living room is in need of a Tiger Coffee Table...  

Tiger Glass Top Coffee Table $200
Disclaimer from owner: The pictures do not do the table justice. Described as a one-of-a-kind item from a shop down the street, that advertises "Antiques, Cool Stuff and Weird Junk"…will definitely be visiting. 
Retro McDonalds Filet O Fish Collectible Kids' Ride $250
Pretty sure I rode this as a kid. Owners are in Port Severn, and if I’m not mistaken, there was a McDonald’s Play Place somewhere around there before McDonald’s Play Places were even a thing. 


Vintage Telephone Table This is actually kind of adorable, owners claim it is in mint condition, and at $25 it seems like a steal. Unfortunately phones are not included, but saw similar ones at Pottery Barn. 

Toilet complete assembly – FREE 
Solid, working. Need 2 bolts for the tank. 
Pick up from the curb.
,,,Enough said. 

Stadium Chairs for the Mancave $100
Kind of a cool idea, apparently the seats are leather. 

Honourable Mentions (not pictured)
Garbage Bag of Women’s Clothing $40
Mix of summer and winter teen/women’s clothing, sizes x-small to medium. With over 50 items in the bag, this could be an okay deal. 

All Kinds of Bottoms! $80
Requires travel to Orillia. Seller seems to have a lot of jeans, shorts and skirts in all sizes, or you can take them all for $80...is that a deal?

50 Shades of Grey and 50 Shades Darker $15
2 for $15…terrible deal, Amazon is cheaper and they will ship to your door. 


** Formatting this post was a nightmare.  


Friday, 22 August 2014

before & after: dining room feature wall

I blame Bathurst Street for being the reason my kitchen is no longer white. Living on one of the busiest streets in Toronto makes having white walls (white anything, really) nearly impossible. You have no idea how much dust, grime and probably pollution billows in through those little Bathurst-facing windows, and it gets everywhere—except on my food. For obvious reasons, I like to think that my food is always clean. 

The kitchen wall I was set on dressing up is visible throughout the apartment. With the exception of standing in the bedroom or bathroom, you can see this wall upon entering the apartment and when seated in the living room—it feels prominent. I wanted something that would catch the eye and help to make my dusty white walls look like the brightest and cleanest white walls that ever existed.

I found my new wall colour while catching up on one of my favourite blogs, Making It Lovely. Nichole was in the middle of transforming her living room and was sampling some very dark and dramatic hues from Benjamin Moore. She wasn’t quite sure about any of the swatches she had painted—but that little two-inch square of Soot had caught my eye. Also, wouldn’t it be kind of ironic to paint my dusty wall Soot?


I did a quick google search on the colour ‘Soot’ and saw a few other rooms painted the same colour. They were lovely, and I was convinced that I had found my colour. I immediately called my dad and invited him over to paint.


Painting Dark Colours 101 
A few things worth mentioning when going with a dark colour:

Dark Colours are Dark 

Shocking, right? Just be aware that if you don’t have a ton of natural light, this could make your room feel small and gloomy.

Compliment with White Trim, Moldings or Features

My last apartment was a junior one bedroom on the first floor. I didn’t get a lot of natural light, but still opted to paint the place grey. It worked because the space had a dropped ceiling, lovely crown molding, and huge double doors leading into the bedroom—which were all painted a bright white. This helped to lighten the space and complimented the dark walls, making it feel a little more cheerful and brighter than it actually was. 

Tinted Primers 

This is especially handy if you are painting over a bright white wall. Prepping your wall with an inexpensive tinted primer will allow you to get that rich paint chip colour—it will also save a bit of money, since you likely won't need a second or third coat of paint. 

Monday, 4 August 2014

so styled: burgers, beers and sangria


Cheers to the August long weekend! And cheers to my second styled post in less than a week (I have found my new obsession).

Despite being cooped up in the house prepping and purging for my move (less than a month!), I managed to satisfy my burger craving with a few cheddar jalapeno patties—sadly the sangria craving went unsatisfied, since the one featured is a fake. But c’est la vie, I will consume my calories with other tasty treats.

Set of 4 Assorted Napkins - Target $6 | Oh Joy! Round Melamine Plates - Target $12  
Lemon & Lime Salt & Pepper Shakers - Pier1 $10 | Planters Sadie Hedgehog Measuring Cups - Pier1 $14  Assorted Succulents - Home Depot $3-$5 | Snack Bowl - Wind & Willow $49 | Gold Craw-fish - New Orleans Souvenir $1.99 | Pickled Corkscrew - Fred & Friends $ unknown  | Lobster Bottle Opener - $ Unknown   

Monday, 28 July 2014

so styled: let's do lunch?


Since starting my blog I’ve always wanted to curate and style a post. Past posts have always been created as more of an afterthought—the result of me farting around my apartment arranging and rearranging something until it stopped annoying me, and then realizing I should probably take a picture for the sake of updating my blog. The pictures are usually grainy, taken at odd hours of the day/night, sometimes taken with my phone and “edited” with an Instagram filter, and are kind of just good enough for the moment.

This post was different. I actually went shopping for this post. Purchases included: one over-priced loaf of (deliciously) crusty artisanal bread, one single linen napkin found on clearance at Pier 1, two sets of salt and pepper shakers (also from Pier 1. And yes, I purchased two because I wasn’t sure which set would work best) and one lovely cloth placemat from Target. Everything else I found in my cupboards or the back of my fridge (I honestly don’t remember buying that lemon, but was so glad to find it).

I arranged everything on Saturday afternoon, but knew I wouldn’t be shooting anything until I had that perfect amount of just-right natural lighting, which I assumed would stream in through the kitchen at noon on Sunday

And because I had already invested all of this time and money setting up the picture, I decided to read the camera manual (something I had never done before). It proved to be helpful, since the picture isn’t blurry. One thing I will keep in mind for next time, is to watch out for embarrassing reflections in the silverware—despite looking perfectly bronzed, it is definitely not a flattering view of my thighs.

And yes, there will be a next time because I actually had way too much fun doing this, and have already decided the next one will be themed around this adorable lobster-shaped bottle opener I have....

Sunday, 22 June 2014

Garbage Finds: I Love Lamp

Since adopting my dog, Maggie, my walk-around-the-block count has gone from zero to a billion in just a few months. This has been great for my waistline, stress –and apartment; because my garbage finds have gone from picking up random pieces of furniture my fellow neighbours don’t want to now picking up the things my ritzy Forest Hill neighbours don’t want—and my ritzy neighbours have had some good stuff!


Exhibit A: My brass globe lamp that likely spent an evening outdoors on the curb. Bringing it in was risky, since it probably had water damage and I’m convinced I could’ve been electrocuted. Thankfully the garbage gods were on my side, and after dragging it up three flights of stairs and giving it a few days to ‘dry out’ I plugged the bad-boy in and have been enjoying it ever since.

My new find increased in personal value when I spotted him in one of my favourite design sites, Lonny, as a Trend We Love feature.

Also worth mentioning: Those new $19 curtains from Target <3   


Dingy Old Dresser Gets a Makeover


Unfortunately I am sans ‘before’ picture for this post – but you must trust that this was a good one. Not only did we sand through several chipped and bubbly layers of paint, but a little extra elbow grease was needed to remove the phrase ‘This dresser sucks’ which had been un-lovingly etched onto the top of the dresser. A few good slathers of ‘Berrylicious’ pink, some new knobs from Anthro, this ‘sucky’ dresser became my bedroom’s focal point.

As most of my DIY projects begin, my mom rescued this little beauty from the Re-Store for under $20. At almost 4-feet high and 1 ½ -feet wide—she knew it would be a great storage piece for a small space. And right she was, because I’ve managed to hide/organize clutter that had been filling up my closet. It is also doing double-duty as my night stand, since the one I was previously using (shown here) looked adorable, but the lack of storage and hiding spaces made it always appear messy.

Lamp – Unknown / prints: Mayan Calendar – a souvenir from Mexico; Bear – Urban Outfitters (Christmas gift from my sister!) / Monogram A – Chapters Indigo /  Jewellery Dish – Chapters Indigo (very old and no longer available) / Dresser Knobs – Anthropologie 

Friday, 17 January 2014

before + after: the [almost complete] gallery wall

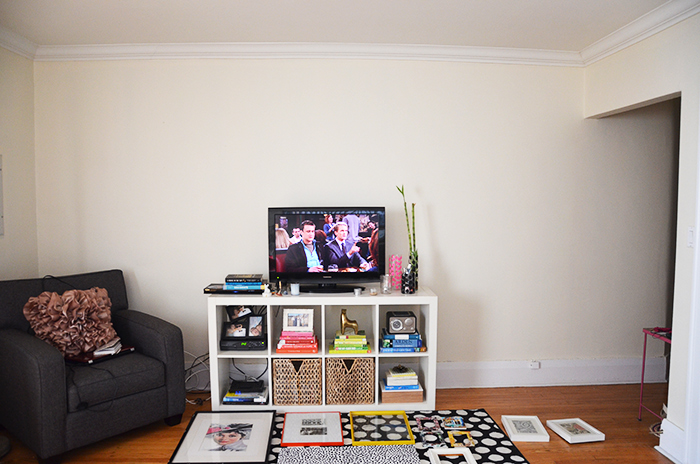
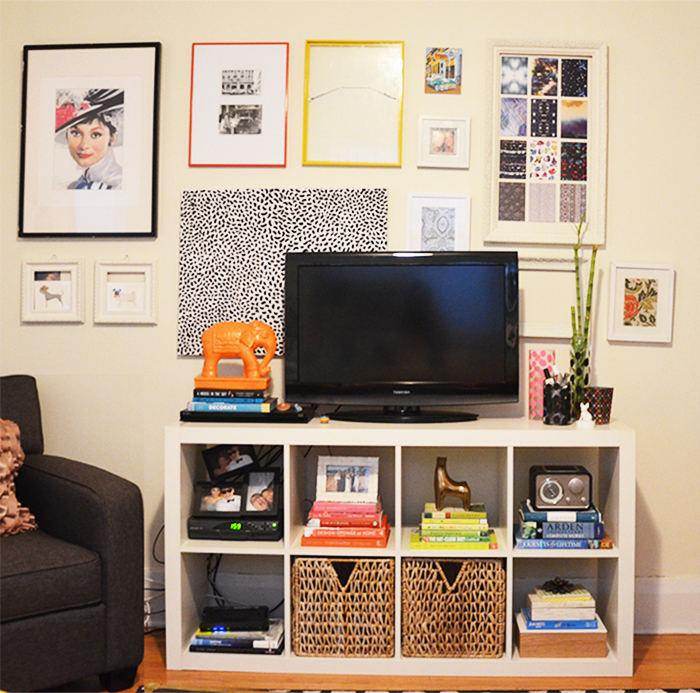
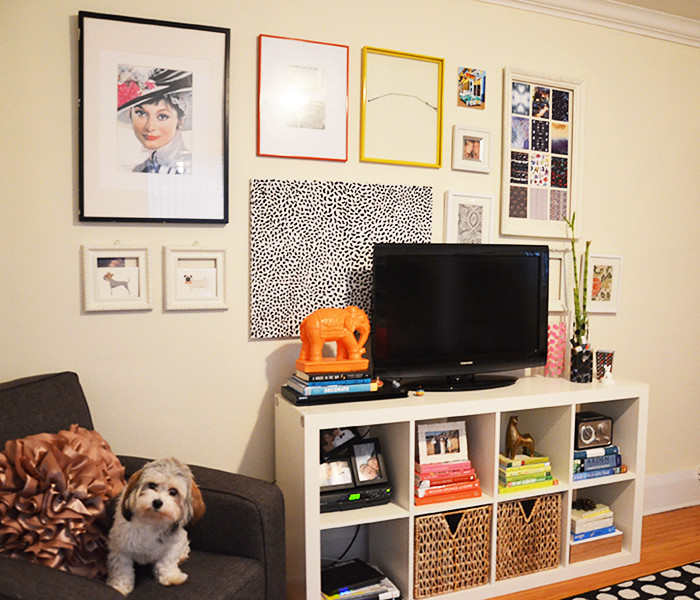
After an unintentionally long hiatus from my blog, I've finally buckled down and rounded up a few pictures of my (still in progress) gallery wall. Although some of the frames my still be empty, the fact that after months and months of humming and hawing I actually managed to put a nail in the wall is a major milestone for my little apartment.

Findings:
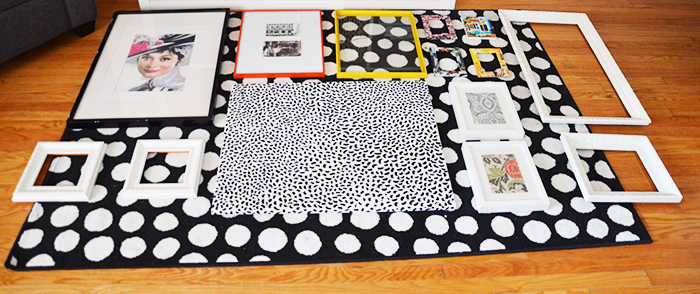
#1. Decide on a layout before you nail.
I laid all of my frames out on the carpet before hanging.
By doing this, I was able to make a few edits to the frames I had initially wanted and replaced with some older ones I dug out of my closet (and by closet, I actually mean the garbage bin in my building...who threw out those red and yellow metal frames? Crazies.)

#2. Try to use a level.
Because I'm lazy and my local Dollar Store didn't have any in stock, I skipped on the level. If you're a perfectionist, this will likely drive you crazy. Since I am not, I am OK with slightly crooked and uneven lines--adds character.

Next challenge: Finding a way to hide those pesky cables and cords.


Had to include an adorable cameo of my new pup Maggie! Check my Instagram for an obsessive amount of pictures of her.